Geometric objects model in Blender


The aim of this document is to inspect the way that Blender 2.32 stores the information for modeling static scenes. I am not an expert on Blender (I have been using Blender for only 2 months) , so I don't claim to know all the intrinsics of Blender. Although I have written this as class notes for a beginners course, I suspect that it would be also useful for intermediate users. My intention is to give some light on the following questions:
  1. How does Blender stores geometric objects? Thus,  which model it uses?
  2. Which objects can be modeled using Blender? (i.e. which is domain of the representation model?)
  3. What are we modifying when we edit the geometry of an object? Why sometimes it is not possible to choose some menu options?
  4. Which is the logic sequence of operations one must follow to change an specific characteristic of an object? For example, how can I change the color of a single face of an object?
Let us have a look at what Blender offers for modeling geometric objects:

  • Meshes, that have faces, edges and vertices.
  • NURBS Curves and Surfaces (that can be converted into meshes).
  • Other geometric objects: metaballs, ...

 ==> Those are the geometric objects in Blender (i.e. elements that have geometry that can be visualized).
  • Groups and hierarchies of objects.
  • Copies and references (links) of objects.
  • Objects (and sometimes, faces) have materials and textures associated to them.
  • Meshes that deform objects (lattices) and skeletons attached to them (armatures).
  • Light focuses (lamps) , cameras, scenes, ...

These elements do not have a visible geometry, but they modify the shape/aspect/organization of geometric objects.

So, how does Blender manage all this information? How is it stored into memory and organized?
Hint: here and there Blender messages and options refer to datablocks.

The conceptual model in Blender

The data structures Blender uses the Object Oriented paradigm. To explore the data structures that constitute our scene model, use the OOPS Schematic  view.  Simply choose in one of your views to activate it.

Note: the OOPS is only a view, not an editor. That means that you can't modify or erase things, change links, etc. in the OOPS Schematic view (in fact, the only thing I was able to modify in this view was the datablock names by pressing KEYN). But you can select objects and parts using this view (sometimes, this is very useful).

Below there is a caption showing two views of a simple scene made of a monkey head (named Suzanne) with a color (Brown) and a texture (Wood) associated, two lamps and a camera. On the left, the OOPS Schematic view of the scene, on the right, the 3D view.


So, a DATABLOCK is an instance of a class (using the OO slang).

First, notice that there are datablocks of the class Object and class Mesh. And there are many others classes: Lamp, camera, material, texture, ...

An OBJECT in Blender is:
An entity (datablock) of the class Object.
+ a pointer to some geometry (Mesh, NURBS or metaball ...). In other words, a link to a geometric datablock.
+ a matrix that stores a linear geometric transformation (i.e. a translation, a scale and a rotation in 3D).
+ optionally: pointers to other entities (datablocks), such as materials.

When you change between object mode and edit mode (with the TAB KEY), you are choosing what to edit, either the object datablock or the geometry datablock linked to it. So, although you can scale an object either in object mode or in edit mode (by selecting all its vertices), in the first case you are changing the values stored in the linear transformation matrix,  and in the second case you are moving/scaling/rotating all the points individually.
Objects have a reference point, its center, that can be used as application point for rotating and scaling, and it is viewed as a single point either in edit and object modes; it is selectable only in object mode. The linear transformation matrix can be numerically changed by pressing KEYN in the object mode.

A MATERIAL in Blender is a datablock of the class Material with:
Colors (basic, specular, mirror)
+ other properties (atributes): alpha, specularity, translucency, etc.
+ optionally: a pointer to a material datablock (or better said, a set of pointers to material datablocks).

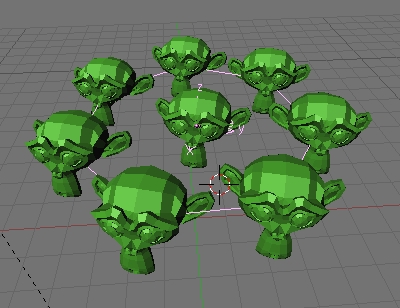
When you copy an object with "Duplicate" (SHIFTD), both the object and the mesh datablock are copied. But when you make a linked duplication (ALT-D), only the object datablock is duplicated, so the old and new objects share the same mesh datablock. This is very useful for modeling symmetric parts of an scene. For example, a mirrored instance of an object can be created in this way by a linked duplication and scaling one of the objects by a factor of -1 in one of the axis directions.

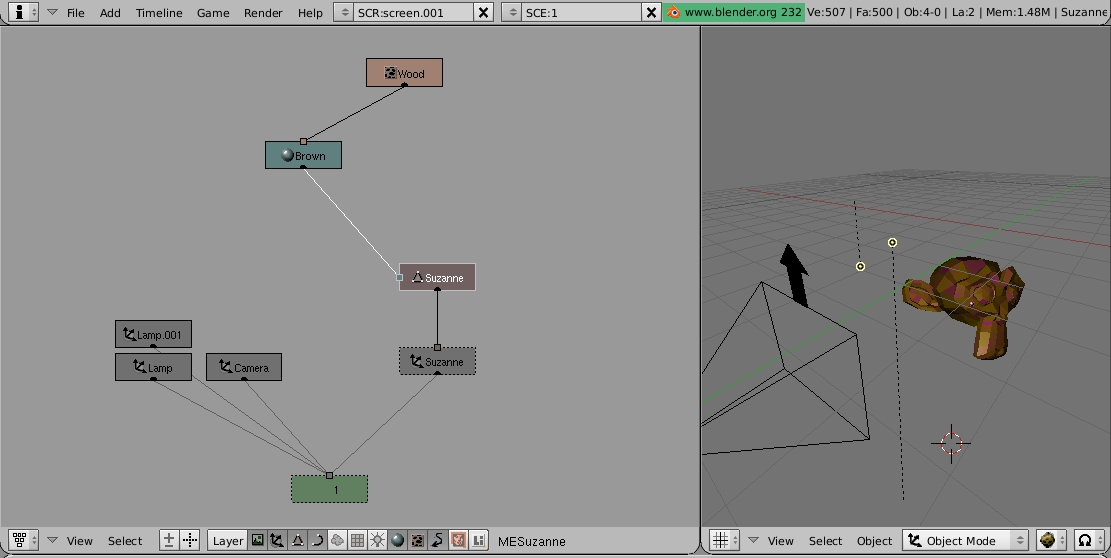
You can inspect what kind of datablocks exist by toggling the buttons in the OOPS view :
Those are: Scene, Object, Mesh, Curve/NURBS /Font, Metaball, Lattice, Lamp, Material, Texture, IPO, Image, Library.

Parent linking

There is a different kind of links: the parent links. An object can be the parent of another, wich in its turn can have some children, and so on, resulting in a hierarchy (or tree) scheme, very useful for organizing everything. These parent links, although of a different kind than the pointers between objects and meshes, for example, are also displayed as black arrows between datablocks in the OOPS view.

You can select several objects linked by these relations with "select->grouped->children" or "select->grouped-> parent", etc. The more interesting thing is that when you move/translate/rotate an object (in object mode, of course) all its children and descendents change in the same way. To get this, Blender modifies the linear transformation matrices of the children objects in the appropriate way. Thus, if you have a hand parent linked to an arm, when you rotate the arm the hand moves accordingly.

Parent links can also be set between objects and lamps, for example (think on the headlights of a car, or on the flame of a candle). There is a special bject, called empty,  with no geometry associated, that can be used as a node of this parent link tree (for example, as the root node of the tree).

Finally, remark that there is also the layer notion, an very useful attribute of the entities that can be used for an optimal organization of our scene.

To experiment with pointers and hierarchies I have created a Blender scene of a tree, arbre.blend. Download it, open it with blender and play with it.


Meshes in Blender

A duplivert is composed of two mesh objects parent link related, with the duplivert flag selected in the parent object. The mesh of the parent is not displayed; instead, a copy of the child mesh is placed in every vertex of the parent mesh.


The Blender mesh editor


Interesting experiments (exercises for the reader):

  1. Try several extrusions of a faces, edges and vertices and deduce how does Blender performs it (which new entities are created and how are linked to the old part of the mesh). Create some non-manifold objects and dangling edges/faces.
  2. Copy objects with duplicate, duplicate linked and see the difference in the OOPS view.
  3. Join two different objects (CTRL-J) and also two duplicate linked objects and look at the results.
  4. Separate part of a mesh (automatically or selecting some vertices).
  5. Copy pointers (make links, CTRL-C).
  6. Create and delete pointers (copy attributes, etc.)
  7. Change the color of a single face in a mesh object. Apply a texture to two faces of the same mesh.
  8. Create hierarchies (make parent, clear parent) and see how parent links are showed in the OOPS view.
  9. Use Make single user to duplicate shared datablocks.
  10. Use the OOPS view to select objects. Use KEYN in this view to rename datablocks.
  11. Make a duplivert.